

 18m (59ft)
 Now free, and rather good. Start below the crack left of centre in the west wall. Pull into a pod and then follow the strenuous crack with…

Pleinmont Point Area
How do I get there?
Carpark location
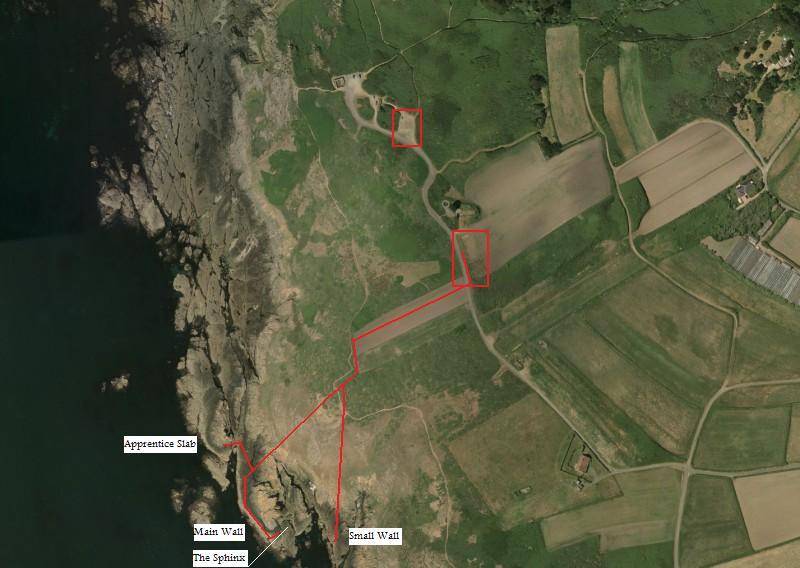
After parking by the german observation tower, walk across the road and down the long field to the cliff path. Turn left and follow the path to a small spoil heap. Head down and across the coupee, scramble down and leftwards around the back past main wall until The Sphinx comes into view.
Below is a link to topo of the climbs at The Sphinx:

Topo A
 18m (59ft)
 Now free, and rather good. Start below the crack left of centre in the west wall. Pull into a pod and then follow the strenuous crack with…
 18m (59ft)
 In the centre of the west wall is a bulging rib with a twisting pink vein. A committing lead though a half decent (but hidden) small wire…

 20m (66ft)
 Start below the overhanging wall near the centre of the cliff where there is a rightward trending crack system. Follow this.

 8m (26ft)
 Start as for The Swarm but trend up and slightly left to the small overhangs on the normal route.
21m (69ft) 12 feet right of Three out of Four is a short crack. Follow this, then up a short slab to the top.
17m (56ft) Follow the blunt arête between The Swarm and Trio starting boldly over a slight bulge.
 17m (56ft)
 Quite good, hard to start. Follow the crack 25 feet to the right past a ledge and overhang.
 13
13 1
1 64
64 84
84 1149
1149 131
131 168191
 12768
12768 372835
 11
11 1
1 2
2 14
14 124
124 139171160
 5858
5858 26
26 2
2 6
6 10
10 13
13 7
7 7
7 2
2 1
1